Most of us think of concrete or cement as something that resists crushing. And fair enough, compressive strength is king in most construction specs. But what about pulling it apart?
That’s where tensile strength comes in. And while it’s a less famous sibling of compressive strength, it matters especially in crack control, shrinkage resistance, and material behavior under flexural or splitting loads.
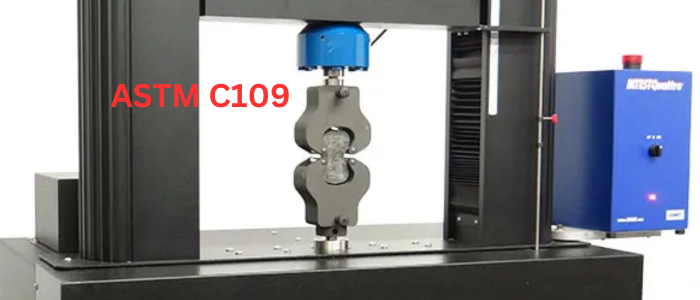
To get a clean, standardized look at cement’s tensile performance, we turn to ASTM C190, the Standard Test Method for Tensile Strength of Hydraulic Cement Mortars.
This test isn’t about concrete beams or cylinders. It’s about pure cement paste and fine sand — formed into a distinctive dumbbell shape called a briquette and pulled apart until it snaps.
So, what does this test actually tell us? How is it done? And where does it fit into real-world applications? Let’s dig into it .
What Does ASTM C190 Actually Measure?
The C190 test evaluates direct tensile strength: how much pulling force a hardened cement mortar can resist before failing. This is different from flexural strength or splitting tension. There’s no indirect stress conversion here. The load is applied directly in tension until failure.
The goal? To compare cements, observe effects of additives, or track how hydration and curing impact internal cohesion, all without interference from coarse aggregate or steel.
If you’re wondering when this test matters: think shrinkage cracks, chemical additives, and early-age behavior. Tensile failure usually starts the cracking process so this test helps predict when and how that might happen.
Equipment and Tools Required
Here’s what you need to perform the test correctly:
-
Cement (hydraulic)
-
Graded standard sand (ASTM C778)
-
Mixing water
-
Mixing bowl and paddle (per ASTM C305)
-
Trowels and spatulas
-
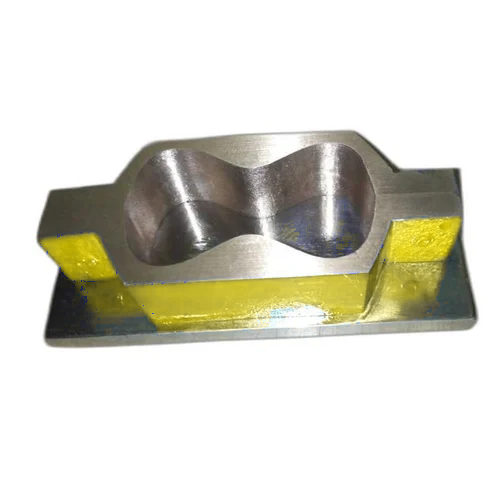
Briquette molds (steel, two-part, forming 25 mm × 25 mm × 76 mm “dog bone” shape)
-
Tamper (rubber or small spatula)
-
Curing equipment (moist cabinet and lime water bath)
-
Tensile testing machine with calibrated grips and self-aligning jaws
The briquette shape is critical — it ensures the failure happens in the narrow middle, not at the shoulders or grips
Proportions and Mixing
The standard mortar proportions are:
-
Cement: 500 grams
-
Standard Sand: 1500 grams
-
Water: 125 mL
This gives a water-cement ratio of 0.25, resulting in a stiff, dense mortar.
Mixing steps:
-
Add water to the bowl first.
-
Add cement gradually while mixing slowly (140 ± 5 rpm).
-
Introduce sand over 30 seconds, then increase to medium speed (285 ± 10 rpm) and mix for 1 minute.
-
Let the mix rest for 90 seconds (covered), scraping sides after 15 seconds.
-
Resume mixing for 1 more minute at medium speed.
You now have the test mortar ready to mold.
Molding the Briquettes
Using a spatula or small trowel, press mortar into the steel briquette mold, packing it in two layers.
-
Tamp each layer with 15 firm strokes (using a tamper or spatula).
-
Slightly overfill and strike off with a straightedge for a smooth, flush surface.
Carefully remove any extra mortar smeared around the mold joints.
Once filled, the molds are covered with a glass plate or plastic sheet and stored in a moist cabinet (or fog room) for the first 24 hours.
⚠️ Tip: Never lift or disturb the molds during the first 24 hours. Any vibration or tilting could weaken the center section of the briquette.
Curing the Specimens
After 24 hours:
-
Carefully demold the briquettes.
-
Submerge them in a saturated lime water bath maintained at 23 ± 2°C (73.5 ± 3.5°F).
-
Keep the specimens submerged until the test age (typically 3, 7, or 28 days).
Water should be clean and saturated with lime to prevent leaching of calcium ions from the surface — which could artificially lower tensile strength.
Tensile Testing Procedure
Before testing:
-
Gently remove each briquette and blot surface moisture (don’t scrub or wipe dry).
-
Inspect the briquette: discard any with visible cracks, voids, or improper shapes.
Testing Steps:
-
Insert each briquette into the tensile testing machine, using the curved jaws that align automatically with the specimen’s shape.
-
Ensure the briquette is centered and snug: misalignment causes bending, not true tension.
-
Apply load steadily so that failure occurs in 20 to 60 seconds.
-
Record the maximum load at failure for each briquette.
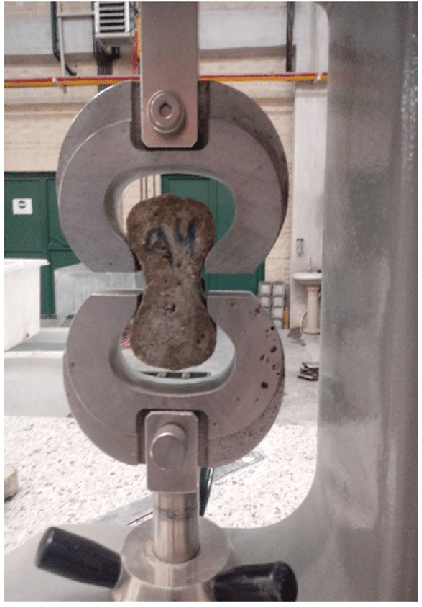
The machine should grip at the wide ends of the briquette — never near the middle, which is where the failure should occur.
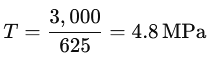
How to Calculate Tensile Strength
The calculation is simple:

Where:
-
T = tensile strength (in MPa or psi)
-
P = maximum load at failure (in N or lb)
-
A = cross-sectional area of the briquette’s narrow section
The reduced section is 25 mm × 25 mm, or 625 mm².
So if a briquette fails at 3,000 N, the tensile strength is:
Repeat for each specimen and take the average of three briquettes to report the result.
Example Log Sheet
| Specimen | Load (N) | Area (mm²) | Strength (MPa) |
|---|---|---|---|
| B1 | 3000 | 625 | 4.80 |
| B2 | 3200 | 625 | 5.12 |
| B3 | 2900 | 625 | 4.64 |
| Avg | – | – | 4.85 MPa |
What Do the Results Tell Us?
ASTM C190 gives a quantitative look at the internal cohesion of cement mortar.
High tensile strength means:
-
Better resistance to shrinkage cracking
-
Higher bond potential with reinforcing steel or embedded materials
-
More cohesive mixes with fewer weak planes
It’s especially useful when:
-
Comparing different cement types (Type I vs. Type V, etc.)
-
Evaluating new SCMs or chemical additives
-
Studying early-age performance (3- or 7-day tests)
-
Checking if surface cracking might originate from poor internal tensile capacity
Pitfalls to Watch For
-
Using molds with worn shoulders. they’ll shift the failure point.
-
Inconsistent mixing or improper sand gradation.
-
Testing too early (before proper hydration).
-
Misaligned grips — leading to flexural failure, not tensile.
Stick to the procedures, and always confirm where the failure occurred — center snapping = valid. Shoulder cracks = invalid.
Final Thoughts
ASTM C190 might not be as widely used as compression or slump tests, but it tells a very different and very valuable story. When cement mortar fails in tension, it often leads to the cracks we see and fear in slabs, walls, and overlays.
If you care about durability, cohesion, and crack resistance, tensile strength matters. And C190 gives you a clean, controlled, repeatable way to measure it.
Find a list of all ASTM tests below:
Complete List of ASTM Tests for Concrete and Construction Materials